How to: Multi-Factor Authentication, Office 365, ADFS v3.0 and SSLs via InTune - Part 5
A series on certificate based authentication.
I know what you’re thinking: does Lucian really have to create another part in this long MFA series? In short, probably not, but I’ll have saved your index finger the thousands of years or scrolling you would have done to read the entire brain dump in a one page post.
So to explain this ‘epilogue’, if you will, on MFA, using X.509 SSLs for your second factor of authentication is a powerful means to automate and manage a process for your mobile and external users. This blog post will explain how to leverage an on-premises Microsoft System Centre Configuration Manager (SCCM) 2012 R2 deployment linked to Microsoft InTune to deliver SSL’s to mobile and external devices to use in MFA.
Multi-Factor Authentication series
MFA series: Part 1 | Part 2 | Part 3 | Part 4
Expanded: Part 5 with a how to on InTune and SCCM for your SSL deployment.
InTune, SCCM and Automated Certificate Enrolment on Mobile’s
Below is a detailed outline of all that is required to use Microsoft InTune and an on-premises SCCM server, along with a few other moving parts to implement a complete MFA solution. I’m going to assume part of this is already in-place in your environment, but if you’d like any feedback or support, feel free to ask in the comments below.
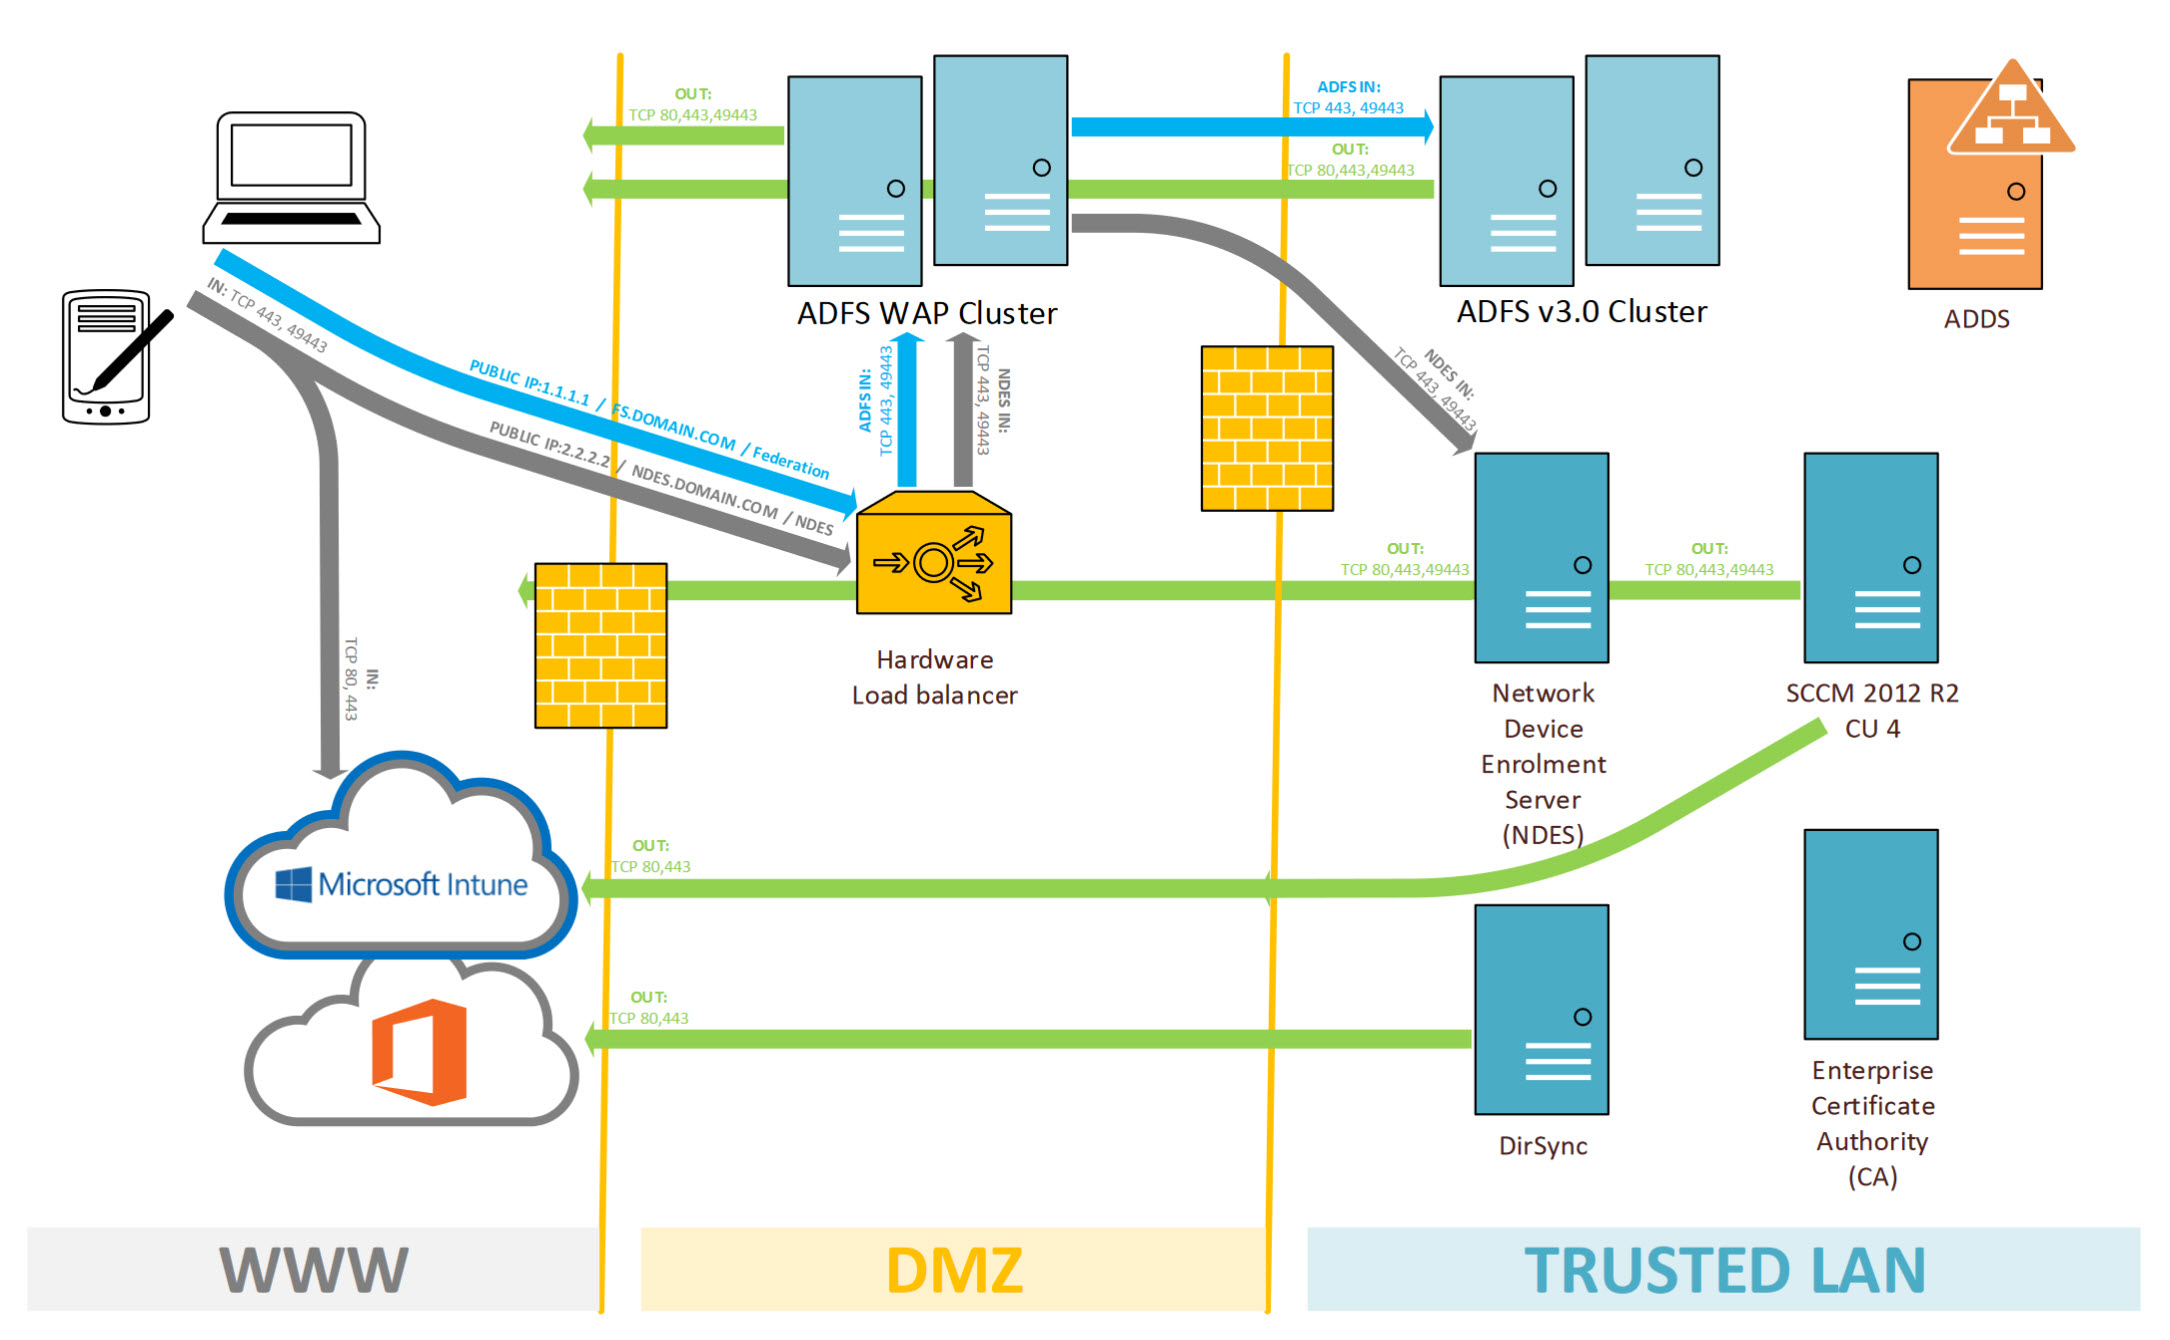
First things first: lets start with a detailed diagram of what we want to achieve:
Components:
- Valid Office 365 subscription
- Valid Microsoft InTune subscription
- System Centre Configuration Manager 2012 R2 CU4
- An Enterprise Certificate Authority (CA)
- A server to host NDES
- ADFS WAP (recommended cluster)
- ADFS (recommended cluster)
- DirSync
- ADDS
Again these components I will assume are already configured and up and running in your environment. For the purposes of this blog series I won’t go into detail on how to deploy ADFS, and ADFS WAP or an Enterprise Certificate Authority.
Overview of the communication workflow
- A device is managed through SCCM/InTune
- Administrator creates an SSL policy and assigns to a device collection
- SSL policy is sent to InTune from SCCM
- InTune creates a challenge for the device
- Policy and the challenge is pushed to the mobile device on next check in
- This policy has the NDES URL required to request an SSL
- Device contacts NDES using the URL
- NDES talks to the SCCM certificate Registration Point (CRP) to validate the challenge
- CRP responds to NDES with “true” or “false” to the challenge verification
- If the challenge is valid and true, NDES generates an SSL via contacting the internal CA
- NDES provides the SSL to SCCM, as well as updating AD (depending SSL template config)
- The SSL is pushed to the device via SCCM > InTune
- Device now has an SSL able to be used for MFA!
Before we start
- The System Centre Configuration Manager (SCCM) environment should be the latest and greatest Commutative Update 4 (version 5.0.7958.1501)
- Your Enterprise Certificate Authority (CA) needs to be at-least Server 2008 R2 (with latest updates) especially update KB2483564 on Server 2008 R2 CA’s
- The NDES needs to be Server 2012 R2 (with latest updates)
- An external or public certificate for NDES, this can be a wildcard for your domain:
- example *.domain.com
- Create a ADDS user called “svc_ndes”
- This will be the service user account for NDES
- Just needs to be a member of domain users
- Connect your System Centre Configuration Manager (SCCM) environment to InTune- if you’d like a process on how to do this, please let me know
Network
I’m also going to assume there is an existing Office 365 hybrid deployment with ADFS and Directory Sync already in-place. With that said- the following network changes are required:
INBOUND
- NDES
- Inbound TCP 443 and TCP 49443 from a public IP to your hardware load-balancer
- Port forward from the HLB to your ADFS WAP cluster
- ADFS WAP
- Inbound TCP 443 and TCP 49443 from DMZ ADFS WAP to NDES server, in case you’ve locked down your ADFS WAP DMZ to ADFS trusted LAN ACL
There’s scarce references online to TCP49443. However, I’ve completed Fiddler traces and found that the challenge process from ADFS does traverse this port so its important to configure. I’ve also seen some references to TCP 80 inbound from mobile clients before they switch to TCP 443 in the connection process, so it might worth allowing and port forwarding TCP80.
OUTBOUND
- Outbound TCP 80, 443 and 49443 from the ADFS WAP cluster to WWW
- NDES server outbound TCP 80, 443 and 49443 to WWW
- SCCM server outbound add TCP 49443, assume TCP 80 and TCP 443 already allowed
Your trusted network or LAN should allow all ports between servers. Your ADFS, DirSync, NDES, SCCM, CA, ADDS servers all need to talk on all available ports.
Enterprise Certificate Authority
Lets start with your CA where we’ll generate a new SSL template to use for user authentication.
- Log into the server with an Enterprise Administrator account
- Launch certsrv.msc
- Go down to certificate templates
- Right click and select Manage
- In the certificate templates console lets create a new template
- Best to replicate the User Template certificate, right click and select Duplicate Template
- SSL Template Configuration
- Name your template: eg. “MFA-Mobility-v1” (in-case you need to create more)
- Validity 1 year
- Tick Publish Certificate in Active Directory
- Purpose: Signature and Encryption
- Purpose: Include symantec algorithms
- Minimum key length: 2048 bit
- UNTICK Allow public key to be exported
- This is for security purposes
- Enrol subject without requiring any user input
- Issuance requirements: leave template blank or defaults
- Superseded templates: leave template blank or defaults
- Extensions:
- Application policies: leave all the User template defaults but make sure Server and Client authentication are both present or selected
- Security:
- Add in your NDES service account: svc_ndes
- Make sure this user has read and enrol permissions
- I’ve also found that all the security groups or users I’ve set to read and enrol and this had no negative effect, including authenticated users and domain users etc, so make sure all are set to read and enrol
- If you somehow have the “everyone” group, delete immediately as that’s a security risk!
For later: Export your CA’s root SSL certificate which we’ll need on both SCCM and NDES.
Network Device Enrolment Server (NDES)
We’re going to deploy a vanilla Windows Server 2012 R2 server to host the NDES role. Deploy that in your environment and follow the steps bellow to configure NDES:
- Log into the server with an Enterprise Administrator account
- Complete all necessary Windows updates- get the server patched 100% up to date
- Disable Windows Firewall and ensure it does not block any communication on any port
- Name your server NDES01
- Join the NDES server to your domain
- Add the svc_ndes user to the local administrators of the server
- Add the svc_ndes user to the local IIS_IUSERS group
- Add the svc_ndes user to the Logon Locally, Logon as a Service and Logon as a Batch job security policies for your NDES server
- Create a Service Principle Name (SPN) for svc_ndes
- Open an elevated cmd prompt and enter:
- setspn -s http/ndes01.domain.local domain\svc_ndes
- This is important to do now as without a SPN your NDES service will not complete successful Kerberos authentication with your CA
- Open an elevated cmd prompt and enter:
- Go to Add Roles and Features
- Install the Web Server (IIS) role, leave everything default
- Except make sure you install Request Filtering
- Located under Web Server (IIS) > Web Server > Security
- Install Active Directory Certificate Services: Network Device Enrolment Server
- Uncheck Certificate Authority and only install the NDES role
- Complete the Network Device Enrolment Service configuration
- Select your internal certificate authority to be associated with NDES
- RE Information - leave all these default
- Configure CSPs for the RA
- Configure the CA value to be used by NDES server
- If your certificate template had a key length of 2048, make sure you add 2048 under both Signature Key Provider and Encryption Key Provider
- Finalize NDES setup configuration
- The NDES server will receive requests through large URL queries, so to ensure nothing gets missed, configure request parameters in the registry as follows:
- Computer > HKLM > System > CurrentControlSet > Services > HTTP > Parameters
- Add: DWORD (32bit value)
- Value: MaxFieldLength
- Data: 65534 (decimal not hex)
- Computer > HKLM > System > CurrentControlSet > Services > HTTP > Parameters
- Add: DWORD (32bit value)
- Value: MaxRequestBytes
- Data: 65534 (decimal not hex)
- Restart your server for these changes to take effect
- Computer > HKLM > System > CurrentControlSet > Services > HTTP > Parameters
- In IIS change Request Filtering on the default website
- Open IIS Manager
- Go to Default Website
- Select Request Filtering
- Select Edit Feature Settings (in the right hand menu)
- Make sure all General options are ticked
- Change Maximum URL length (bytes) to 65534
- Change Maximum query length (bytes to 65534
- Restart your server for these changes to take effect, iisreset is not enough
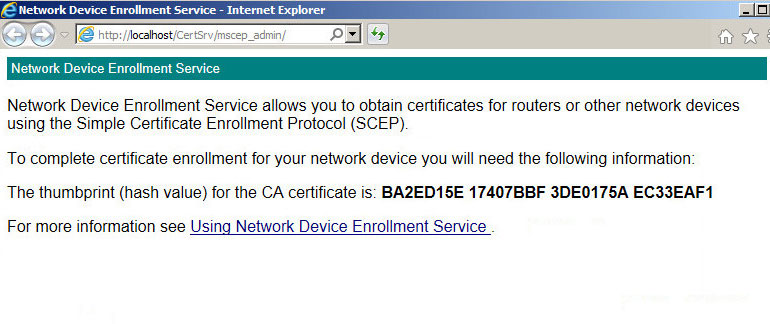
- Testing: following the restart you should be able to go to the following URL
-
If you get an error 503 or “Service unavailable” its likely that the application pool in IIS has stopped. Otherwise review the eventvwr for more information.
-
Server SSL certificate
- You’ll need an SSL certificate from your CA for NDES to use in IIS
- Grab your wildcard SSL and install on your NDES server
- Install in the Local Computer > Personal > Certificates store
- Open ISS and assign this to port 443
- Select the Default Website
- Select Bindings
- Edit HTTPS and select the wildcard SSL
- Leave this screen open
-
We’ll need to also add Binding on port 49443 - this is for traffic relating to SSL requests through the NDES server
- Add in a new Binding
- Select style HTTPS
- Set IP Address as All Unassigned
- Set the port to 49443
- Select your wildcard SSL for the SSL
System Server Configuration Manager 2012 R2
- Log into the server with administrator rights
- If your primary SCCM server doesn’t have IIS, add the IIS role
- Include ASP.NET 3.4 and 4.5 libraries
- Include WCF HTTP Authentication
- Include IIS 6 Compatibility management
- Open IIS Management
- Check Bindings
- Ensure there is a HTTP site binding
- Ensure there is a HTTPS site binding
- If there isn’t an HTTPS binding, add one
- Request the SSL for the HTTPS binding from the internal CA. This can be a simple web server certificate with the common name of the SSL the internal FQDN of the SCCM server
IMPORTANT
-
Start > Run > mmc
-
File > Add or Remove Snap-ins
-
Select Certificates
-
Select Local Computer
-
Find the web server SSL assigned to SCCM.domain.local
-
Export the SSL including the private key
-
COPY THIS TO NDES
-
Install on your NDES server in Local Computer > Personal > Certificates
-
Check local server sharing
- Ensure you can access \FQDN\c$
- If you cannot, enable File and Sharing in Windows Firewall
- Alternatively disable Windows Firewall like I always do
-
Copy your internal CA’s root CA onto your SCCM server- leave it in C:\SSL\ for example
-
Deploy the Certificate Registration Point (CRP) SCCM role
- Open the SCCM administrative console
- Go to Administration > Site Configuration > Serve and Site System Roles
- Select your primary site, right click and select Add Site System Roles
- Select Certificate Registration Point (CRP)
- Leave the website name and virtual application name default, no need to change
- I’m going to assume you’re using 443 as the desired port, but this can be altered if need be, otherwise sticking to default is ideal
- Enter in the EXTERNAL URL of your NDES server - very important!:
- Select your CAs ROOT SSL from C:\SSL\
- Complete the CRP install
-
Ideally we now would restart SCCM CRP server
Testing and install confirmation
- Checking logs on SCCM to determine if the install was successful, also handy for troubleshooting
- To be able to view log files efficiently: download the SCCM Configuration Manager Toolkit
- C:\Program Files\Microsoft Configuration Manager\Logs\CRPMSI.log
- Log should read “Installation success or error status: 0”
- C:\Program Files\Microsoft Configuration Manager\Logs\crpsetup.log
- Log should read “CRP.msi exited with return code: 0”
- C:\Program Files\Microsoft Configuration Manager\Logs\crpctrl.log
- This is a tricky one as initially the key line item will be RED and show status “CRP’s previous status was 1 (0 = Online, 1 = Failed, 4 = Undefined)”
- However after 600 seconds or 10min, it will change to “CRP’s previous status was 0 (0 = Online, 1 = Failed, 4 = Undefined)” which is ideal
- You can speed up the 600 sec interval by stopping and starting the “ConfigMgr CRP Service Pool” application pool in IIS
- C:\Program Files\SMS_CCM\CRP\Logs\CRP.log
- There should be no errors in this log
- Open IE and check the CRP service via the following URL:
- https://SCCMServer.domain.local/CMCertificateRegistration
- You should get a error 403
- Your external wildcard SSL will also trigger an alert as it will mismatch with your sscm.domain.local FQDN
- If you’ve setup and internal zone for your external domain, internally you can point ndes.domain.com to your SCCM server and check that URL again
- https://ndes.domain.com/CMCertificateRegistration
- If you get a unavailable or 503 error- change the following in IIS
- Open IIS Manager
- Go to your Default Website
- Select CMCertificateRegistration
- Select under CMCR > SSL Settings
- Tick Require SSL
- Tick Require Client Certificates
CRP configuration continued
- After CRP is installed, SCCM will generate a special SSL anytime from 10min after configuration to an hour or several hours depending on your environment complexity
- This SSL is saved to: C:\Program Files\Microsoft Configuration Manager\inboxes\certmgr.box
- The SSL will be called something like CRP_SCCM.DOMAIN.LOCAL.cer
- Once that has been saved to this location, copy this to your NDES server
- Locate your SCCM install media
- You’ll need to find a CRP installation folder
- This folder is SMSSETUP\PolicyModule\X64
- Copy this folder with ths contents to your NDES server
- The main component is PolicyModuleSetup.exe which we’ll run on the NDES server
NDES
- Log into the server with administrator rights
- Find and run PolicyModuleSetup.exe which you previously copied from SCCM
- Enter in the CRP URL as follows using the SCCM internal FQDN:
- https://SCCM.domain.local/CMCertificateRegistration
- Specify the CRP port at 443 (you can change if need be, I wouldn’t)
- Select the SSL certificate we exported earlier
- This will be sccm.domain.local located in the local computer > personal > certificates store
- On the next SSL selection screen you’ll select the SSL we copied from “certmgr.box”
- Finalize configuration
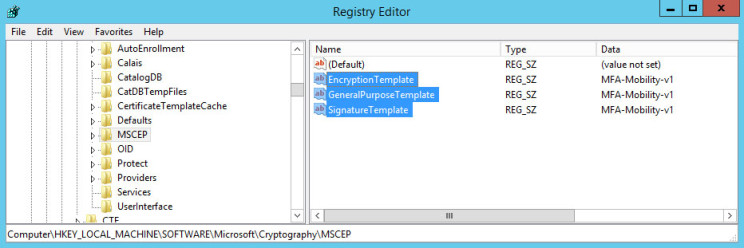
- Open the registry
- Go to HKLM > Software > Microsoft > Cryptography > MSCEP
- Make sure that the 3x values of:
- EncryptionTemplate
- GeneralPurposeTemplate
- SignatureTemplate
- All match the name of your SSL template in your CA, e.g. “MFA-Mobility-v1”
- Make sure this matches!
- Open an elevated cmd prompt and iisreset
- Try and access form NDES the URL https://ndes.domain.com/certsrv/mscep/mscep.dll
- Now you should get an error 403- this is expected
You’ll find that once you run the PolicyManagerSetup, the .exe won’t let you check any settings, without uninstalling and reinstalling the SCCM module You can however check the settings n the registry in the following key: HKLM > Software > Microsoft > Cryptography > MSCEP > Modules > NDESPolicy All the items are string values and can be view and changed if need be Note: a restart is required if you change any of these string values
SCCM
The final piece is to configure the two SCCM policies relating to SSL deployment. The first is the ROOT CA policy which deploys the ROOT CA to the trusted certificates store, while the second policy is the user certificate policy we enroll through NDES.
- Log into the server with administrator rights
- Launch SCCM configuration manager
- Go to Assets and Compliance > Compliance Settings > Company Resource Access > Certificate Profiles
- Right click and create a new Certificate Profile
- Name the profile something like Mobility-ROOT-CA
- Select Trusted CA Certificate
- Import your CA root CA that we saved earlier to C:\SSL
- Select the platform you want to deploy this to, in my case i selected all
- Finalize setup
- Right click and create a new Certificate Profile
- Name the profile something like Mobility-SCEP
- Select Simple Certificate Enrollment Protocol (SCEP)
- Leave SCEP enrollment settings all default
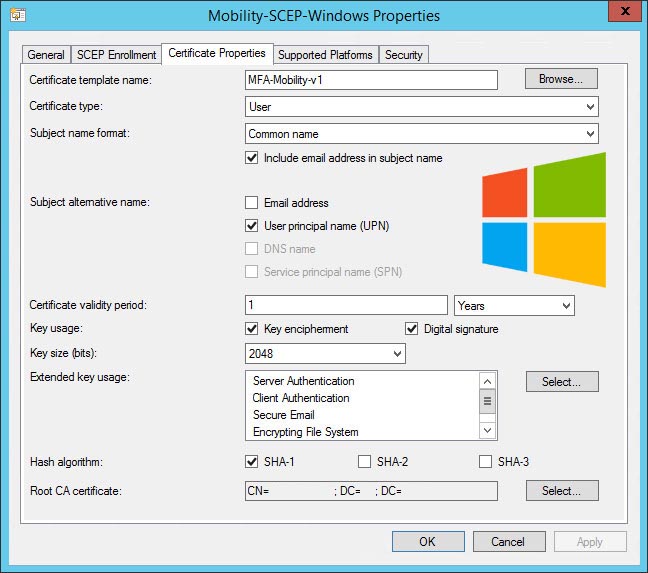
- Certificate properties:
- Select your certificate template, eg. “MFA-Mobility-v1”
- Set the certificate type to User
- Subject name format: Common Name
- Subject alternative name: User Principle Name (UPN)
- Match the remainder of the settings to your template
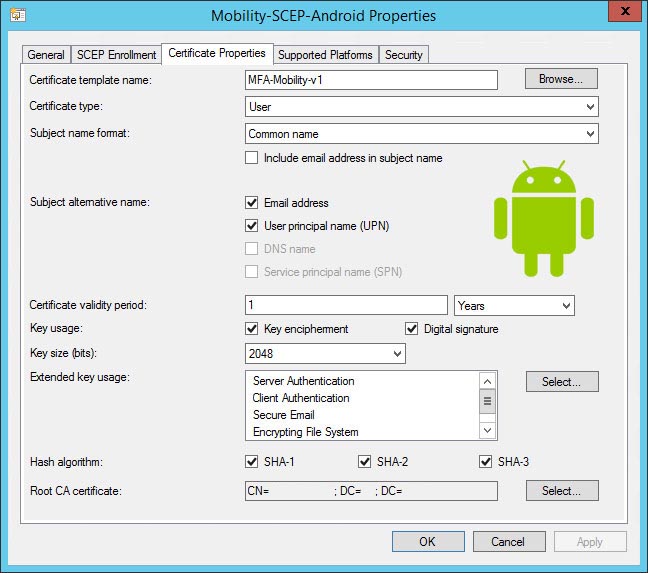
*Update 2015-04-20* - Added 3 examples for different platforms:
Windows 8, 8.1, RT example:
iOS example:
Android example:
Select the platform you want to deploy this to, in my case I selected all
- Finalize setup
Assign these two new policies to the desired DEVICE COLLECTION. This is important as assigning to a user collection will result in the SSL’s not being deployed, in my experience.
User acceptance testing
The UAT process that I’ve completed for example purposes is a Windows 8.1 Pro VM. This is a vanilla VM with only Windows updates applied to it, no other software or configuration completed.
- Log into Windows 8.1 as an administrator
- Pull the right hand charm bar and select Settings then Change PC Settings
- Or open via Windows start menu via the Settings app
- Select Network
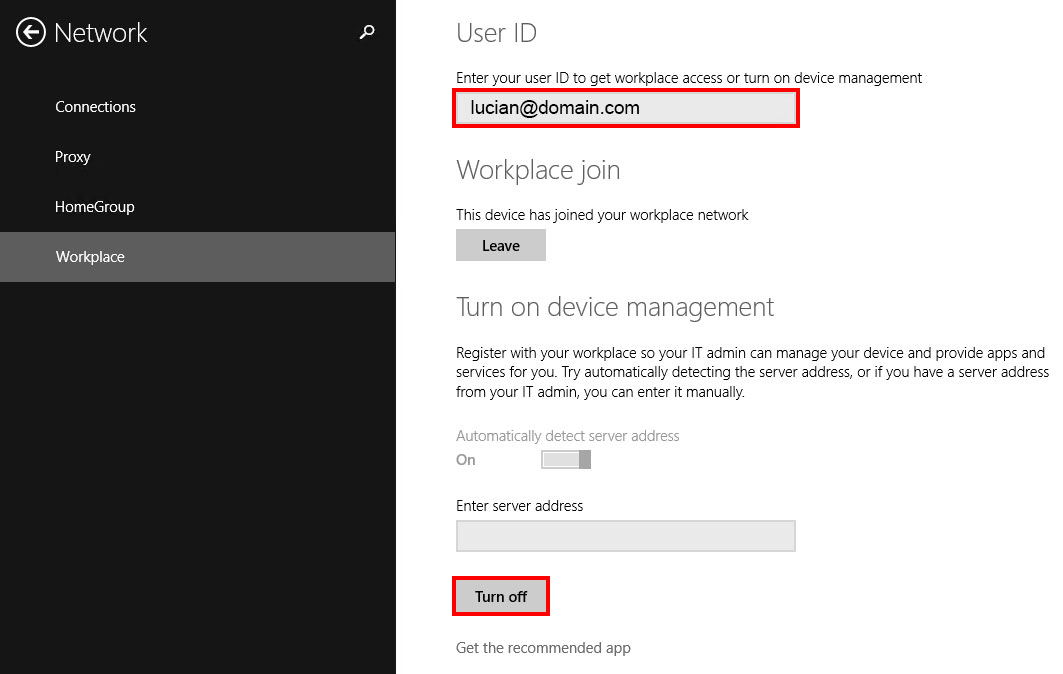
- Select Workplace
- We will be completing the Workplace join process
- Enter in your domain User ID in the UPN format
- UPN example: [email protected]
- You’ll get prompted to authenticate as the authentication process now uses ADAL to connect to your ADFS servers
- Select join
- Complete this process
Next to allow InTune and SCCM to manage the device, lets turn on Device Management:
- Under the User ID, select Turn On under Turn on Device Management
- You’ll get promoted to authenticate again
- You also will see a prompt with Ts and Cs to confirm you want to turn on device management, accept and complete this process
- In the background a InTune agent gets deployed on your workstation
- This can take anywhere from 5min to an hour
In the meantime we can enable MFA on your user account:
- Log into your primary ADFS server as an administrator
- Launch ADFS management
- Go to Authentication Policies > Per Relaying Party Trust
- Right click Microsoft Office 365 Identity Platform and select properties
- Go to Multi-Factor
- For testing
- Add in your user account in the users/groups section
- Ideally in a production environment you would assign this to a group, or leverage the Device and or Location options
- MFA is now enabled (give or take 2-5min while ADFS replicates between your cluster)
Finally, lets enable MFA on the client by changing some registry keys:
To enable modern authentication:
| # | REGISTRY KEY | TYPE | VALUE |
|---|---|---|---|
| 1 | HKCU\SOFTWARE\Microsoft\Office\15.0\Common\Identity\EnableADAL | REG_DWORD | 1 |
| 2 | HKCU\SOFTWARE\Microsoft\Office\15.0\Common\Identity\Version | REG_DWORD | 1 |
| 3 | HKCU\SOFTWARE\Microsoft\Office\15.0\Common\Debug\TCOTrace | REG_DWORD | 3 |
To disable modern authentication:
| # | REGISTRY KEY | TYPE | VALUE |
|---|---|---|---|
| 1 | HKCU\SOFTWARE\Microsoft\Office\15.0\Common\Identity\EnableADAL | REG_DWORD | 0 |
| 2 | HKCU\SOFTWARE\Microsoft\Office\15.0\Common\Identity\Version | REG_DWORD | 1 |
Sidebar - Certificate Authority - I just wanted to mention that a successful certificate deployment can be seen on your CA in certsrv. If you go to Issued Certificates, you’ll see that “svc_ndes” will be requesting SSLs with your “MFA-Mobility-v1”. Ideally you would want something more secure that a service account doing this, though at this stage I’ve not gone into it enough to check what other options there are to strengthen this process further.
Final words
After all is said and done and you’ve gone though the Lord of the Rings like journey from start to finish, you will be able to complete a MFA request with your SSLs on your device, authenticating to ADFS and allowing access to Office 365 services.
